Tuesday, April 9, 2013

Gold Lace Crown

Today is my birthday! To celebrate the momentous occasion, I made a little gold crown fascinator. Sometimes it's good to be queen. For the days I feel down, or the days I just need a little more sparkle, I have my little crown to brighten the day.


I bought the lace at JoAnn's Etc. I liked the shape and the fact that it can be divided into 2 distinct layers. I made a second layer to strengthen the base and give it more dimension. It's also important to use water resistant Mod Podge. Otherwise, it will mix with the acrylic paint and just be a huge mess.

You need:
about 18" lace
scissors
needle and thread
sponge brush or paint brush
Mod Podge
wax paper
gold acrylic craft paint
a bobby pin (optional)


Start by cutting 2 pieces of lace that are the same length. Mine were around 8" each. I had a small swatch of lace leftover. You can trim the second piece to be the base of the crown.


Stitch each piece into a round with the needle and thread. Line up the decorative parts. It will hide the seam.


Fit the taller piece inside the shorter one and stitch them together around the base.


If it looks like this, you're doing it right. Try to line both of the seams up.


Over wax paper, coat the entire crown with a thin layer of Mod Podge. It should be enough that it will hold its form when you stand it upright. Try to avoid making any Mod Podge bubbles in the lace openings.


Let that puppy dry. Be sure it is in a nice circle while it dries. The Mod Podge will stiffen it and you won't be able to fix any weird bumps or lumps later.
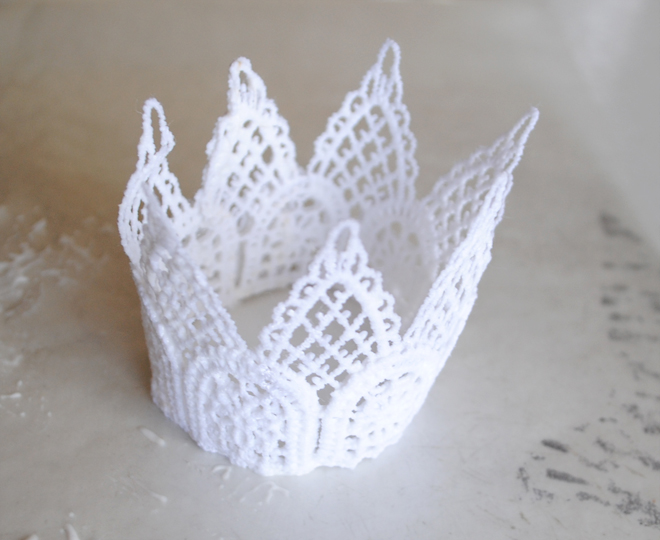

Using a sponge brush or paint brush (I went with the paint brush so I could get inside the nooks and crannies.) Paint your crown gold. It may take a couple coats to get a nice finish and to get all of the holes.


Et voilà! A little gold crown for the Queen of the Darling Apartment! At this point you could put a bobby pin through one of the holes on the bottom. You could tie it with elastic string, but I find a bobby pin far less intrusive.


Sunday, March 24, 2013

Pie Sunday: Passover Charoset Pie

My coworker and friend, Erin, is one of my biggest supporters on this blog. She recently asked me come up with a Passover pie. She said one of the biggest complaints of the Passover meal is the monotony. I needed to come up with a way to make a new pie without completely throwing out tradition. 


Erin described the various foods eaten during passover. The best one to manipulate seemed to be  charoset. It is a mixture of apples, walnuts, Manischewitz and cinnamon The sweetness was already appealing to make a pie. Erin suggested I use matzo meal for the crust. The end result is a charoset pie you will be happy add to your holiday tradition.


You need:

1 1/2 c matzo meal
1 T white sugar
1/2 tsp salt
7 T butter, melted
2-3 T cold milk

6 c apples, peeled, cored, chopped into small chunks
1/2 c Manischewitz wine
1 1/2 c walnuts, coarsely chopped
1/2 c brown sugar
1/4 c honey
3 T potato starch
1 tsp cinnamon
1 T butter, cut into bits

Combine matzo meal, sugar, and salt in a mixing bowl. Add butter and milk until the mixture is crumbly, but forms together when pressed. Press about 1 c of the mixture into the bottom and sides of a 9" pie pan. Leave the rest to sprinkle over the top.

Soak the apples in Manischewitz, tossing occasionally to coat for about 30 minutes in a large, heavy bottom stock pot. Add the walnuts, brown sugar, honey, potato starch, and cinnamon to the apples and stir together over medium heat. Continue stirring occasionally until the mixture begins to thicken.

Pour the apple mixture into the prepared crust and dot with butter. Crumble the remaining matzo crust over the top. Bake at 375ºF for 35-40 minutes or until the filling is bubbly and the crust is golden. Cool on a rack before serving.


Wednesday, November 21, 2012

Cranberry Sauce


Since I won't be able to see my friend, Colleen, at Thanksgiving this year, we had a "Friendsgiving" this past weekend. It was my job to bring dessert and cranberry sauce. I'd never made cranberry sauce. After doing research, I realized it is so easy to make. The idea of canned cranberry sauce is about as criminal as whole canned chicken. Look it up. It's a real thing. I refuse to show you myself. You can't make me. Oh okay, here it is.

In all honesty, it took me 15 minutes and tastes way better than the gel you need to cut up into cubes. Trust me on this and just try this recipe. Aldi has 12 oz bags of cranberries for $0.99. I'm fairly certain that's the same price as a can and you will get twice as much sauce that is not in the shape of a ribbed cylinder. For the sake of your guests, just try it. Buy a can of sauce if you want backup, but trust me, you'll just end up throwing it away.

Look how pretty! This is when they start to pop.


You need:

1 c sugar
1 c water
12 oz bag cranberries, rinsed
1/4 tsp cinnamon
1/8 tsp cloves
2 tsp grated orange peel, optional

Dissolve the sugar in water over medium high heat. When the mixture is clear, add the cranberries. Stir the berries until they start to pop. You will hear the crackle sound.

Add the cinnamon, cloves, and orange peel. The measurements were an estimate. It is really to whatever taste you are comfortable.

Continue stirring the berries until they have all popped. I smashed a few spoonfuls against the side of the pan after they popped to make a smoother sauce, but I still wanted whole berries in there.

Some bubbling cranberry sauce
Pour the sauce into a heat resistant bowl to cool. Store in the refrigerator until serving. The sauce will thicken as it cools.

Silky, sweet and tart

Tuesday, November 20, 2012

Pumpkin Spice Cake with Apple Cider Glaze

As much as I hate to admit it, some people just don't like pie. As Thanksgiving is such a pie heavy holiday, here is a recipe to keep those blasphemers happy when everyone else is enjoying true pie bliss. That isn't to say this cake isn't good. It won the popular vote in a cake contest. I'm also not embarrassed to say the key ingredient is a cake mix. A tasty cake is a tasty cake, and this my friends, is the tastiest.

When I am old, rich and eccentric, I will have a built in bookcase wall devoted to bundt pans.


You need:

For cake:
1 box spice cake mix
1 box vanilla pudding, instant
1 can pumpkin puree
3 eggs
1/2 c oil
1/2 c water
1 tsp vanilla
1 tsp cinnamon

For glaze:
1 c powdered sugar
1/2 tsp pumpkin pie spice
2 T apple cider


Mix the spice cake mix with the vanilla pudding. Add the rest of the ingredients for the cake and mix until smooth. Pour the batter into a greased bundt pan and tap the pan gently on the counter to even out the batter.

Bake at 350ºF for 45 minutes or until a toothpick inserted in the thickest part comes out clean. Let the cake rest in the pan for 10-15 minutes. Turn the cake out onto a cooling rack to continue cooling.

Once the cake is completely cool, whisk the powdered sugar, pumpkin pie spice and cider until smooth and drizzle over cake. For a thicker glaze, use less cider.


A note on bake times:

Not all pans are created equal. The time it takes for a bundt cake to bake is much longer than a 13"x9" pan. If you are using a 13"x9" reduce the time to 35 minutes and the same for two round 8"x8". Two 9"x9" should be around 30 minutes and cupcakes should be around 20-25 minutes. As always, check the center of your cakes with a toothpick to be sure. Bake times can vary greatly.